Julie Bowersett

juliebowersett{at}gmail{dot}com
Navigation
Search
Categories

Blog Writing Course Alumni

From Guide to Art Schools

CraftGossip

Entries in edibles (27)

Wednesday
Feb102016

Winter Holidays

Every day that passes without a new blog post seems to sink me further and further.  So, in an attempt to get back on my horse, I'm writing this post and filling it will lots of miscellany which is what my life is all about these days.  I have been finding tiny chunks of time to sew, much of it by hand in the evenings.  I've got some projects that are *almost* ready for blogging and am hoping that I can keep a more regular schedule soon.  Much of my time recently has been spent in the ongoing project of organizing my studio.  I am finally seeing light at the end of the tunnel, and will share the "big reveal" here when I'm finished.

Technology is a wonderful thing, except when it's not.  My old laptop died a few weeks ago and I had to replace it.  Which also meant reinstalling all of the various programs I use.  Photoshop needed to be installed before I could hope to post any pictures so I set about that task today.  Except that my new laptop doesn't have a CD drive, so I had to download all of the necessary files and then spend an hour on chat with Adobe before they finally told me I'd have to upgrade to the latest program to be compatible with my new operating system.  Sigh.

Christmas came and went.  Along with making multiple batches of my usual Salted Caramel Chex Mix and Rosemary Pecans with Cranberries I sewed my boys a couple of walking capes which can function as attire for Jedi, Hobbits, Medieval peasants or whatever takes their fancy. Here's a shot of the two capes, front and back.

The fabric was rayon/linen and very nice to work with. I flat felled all of the seams which makes for a nice, clean and sturdy finish.

I'm still working on a couple of "big white shirts" (think pirate) for them as well.  I've got to set the grommets still but they are nearly finished.

We had a big snow storm in January and the newest member of our family, aptly named Winter, really enjoyed it along with my kids. I, however, lost a week of my life. :-)

A few years ago I blogged about making King Cake for Mardi Gras.  This year I tried a recipe from Southern Living.  The Southern Living cakes (the recipe makes 2) are assembled jelly roll style rather than braiding like the recipe I've always used in the past.  I made a different flavor for each of the cakes.  The first was the traditional cinnamon-sugar filling complete with green, gold and purple sanding sugar.

The second had a cream cheese filling and cherry preserves (the recipe for the cream cheese filling is included in the Southern Living recipe).  I skipped the sanding sugar on this one.

This recipe was nearly as good as my original and much less work.  The best advice I have is to make sure you don't overbake the cakes which will dry them out. Also, the area where the two ends are joined together to make the ring is always a little skimpy so I used a bit of extra dough and wrapped the join to add a little substance to that area.  Make sure that all of the seams are well sealed so the filling doesn't leak out while baking.

I invited a group of my friends over to celebrate Mardi Gras and help me eat up these sweets.

Next up is Valentine's Day.  My kids are busy making cards for their friends and I'm gearing up to lead the craft at the class party (no surprise there).  We're going to make a cute card holder for the delivered valentines.  I found this idea on Pinterest.  Here's my version:

It's simply two paper plates, folded in half and then stapled together in a heart-shaped configuration.  Decorate as desired, punch some holes and hang with a ribbon.

I hope everyone has a wonderful Valentine's Day.

Thursday
Dec252014

Christmas and Winter

Hello sweet friends, who I haven't seen in so long.  This past year has been so full -- too full, really, and certainly too full to keep up with my blog.  Which makes me sad because I miss it so, both as a form of record-keeping and a way to connect with friends near and far.

As some of you may know, I moved my family this summer and we have still not recovered from the process.  And here it is Christmas already!  We've now landed in Charlottesville, Virginia, in a sweet little house on two acres of (mostly) woods.

It is a lovely quiet spot and we are enjoying being out in the country.  Here's the little treehouse that we are having built for our boys in the back yard.

We are still getting settled here, a task made more difficult because much of our furniture is residing at our old house which is still on the market.  I previously wrote about the construction of my sewing studio, and that area, too, is still being sorted out.  Here's what it looks like at present:

The furniture I ordered to help tame this mess has been repeatedly back-ordered but finally arrived last week.  I'm hoping to get it assembled after the new year begins and get this place under control.  I have been doing some sewing despite the chaos, but some of my furniture hasn't made the move quite yet, so I've been making do.

I was busy this Christmas with lots of projects, most from my kitchen but some from my studio.  I made my husband a fleece vest and matching neck gaiter.  I also made my boys gaiters.  No pictures of those yet.  I also completed a project that has been on my wish list for at least 8 years -- a new star for the top of our Christmas tree. 

I created this from wool blend felt and used this pattern for the design.  The embroidery was done with perle cotton, silk ribbon and silver chop beads.  The pearl beads were left over from the beadwork on my wedding dress and the button in the middle was an extra from that same project.

I stitched an extra layer of felt to the inside of the star, leaving the bottom open to be slipped over the top of the tree.  I used a blanket stitch and more perle cotton to construct the star.

I did quite a bit of baking/cooking this year.  Our church had a Christmas bazaar and I made a number of items for the bake sale table as well as many bags of goodies for gifts to friends and family.

Eggnog Bread

Cookies for Santa

Rosemary Pecans with Cranberries

Salted Caramel Chex Mix

My neighbor gave me a jar of delicious Olive Tapenade along with the recipe so I had to make my own jars.  I'll share this recipe with you at a later time.

I've also been doing quite a bit of hand sewing in the evenings.  My studio is over our detached garage so it is a little harder to access.  I've been keeping a little bag of hand stitching in the house to work on.  I can't share one of the projects because it is still waiting to go out to a friend as a gift and I don't want to spoil the surprise in case she reads this post.  But I'll share once the gift has been given.

I have always found the quiet and spare days of winter to be my most productive time in my studio.  I love the quality of the light which is so different than other times of the year, and there are fewer distractions.  I am already looking forward to turning the calendar to January 2015 and really settling in to get some sewing done.  I hope that my life will now allow me to create more and post more.  I've really missed those things.

Wednesday
May212014

Graduation Cap Treats

Tomorrow is my youngest's last day of preschool, so in honor of his "graduation" on Friday I made these graduation cap treats.  They were super simple to put together.  Here's how I did it.

I started with chocolate graham crackers (seriously, the hardest part of this entire project was getting the graham crackers to break into proper squares.  I ended up cutting them with a big knife.)  I "iced" each square with melted semi-sweet chocolate and topped them with an M&M.

Once the chocolate hardened (I put them in the fridge for 30 minutes) I piped yellow icing to resemble a tassel on top.

Previously, I had baked some brownie bites using a boxed mix (do yourself a favor and subsitute melted butter for the oil called for in the mix directions -- heavenly!) and my mini-muffin pan.  Place the brownies with the flat bottom side facing up.

I used this Cookie Icing and placed a dollop off-center on the bottom of the brownie bites

then placed the graham cracker pieces on top of the icing, pressing them down so they were slightly slanted.

Friday
Oct112013

Cake Pops, Burger Cookies and Birthdays

Hello, friends.  Wow, I have been missing in action for quite a while, haven't I?  I am not even going to offer any excuses except to say that life has gotten in the way of my creativity lately.  But recently my sewing mojo has been seeping back in and I have managed to spend several days this week in my sewing room.  I've been spending even more time in my kitchen in the last few weeks; fall is birthday season at our house and I have been making and baking like crazy.  Since I don't have any of my sewing projects ready to reveal I'll share the goodies I've been making.

I like cupcakes.  I have always liked cake, and since I've found a great icing recipe I even like that, too.  This year I decided to try out a chocolate version based on the same recipe.  Here's a link to the site where I found the recipe.  I added extra cocoa at the end as suggested in the recipe.  This definitely boosted the chocolate flavor but I found it added a bitterness that some kids might object to.  I think I might up the sugar a bit next time, or try adding more semi-sweet chocolate.

I baked a lot of cupcakes.  I also baked an extra layer cake to make some cake pops.  Cake pops have been around for a while but this was my first attempt at them.  Bakerella is credited with this craze, and I used her book on the subject to get started (her website is full of ideas and recipes).   I read a lot of helpful hints on the internet and found lots of differing opinions about the best way to make them.  Most people agreed that their first attempt was far from perfect.  My experience was the same.

Folks also disagree on the best method for making the cake balls that become cake pops but the general gist is that you bake a cake (boxed mix is fine for this) and once cooled crumble it up into fine crumbs (with your hands, a mixer or any other tool you wish to try).  Add (canned) frosting, anywhere from a few tablespoons to 3/4 of the can.  Mix this up (again, by whatever method you prefer; I used my stand mixer) until you have a soft dough.  You then shape the dough into round balls (I used a cookie scoop for portion control).  Again, people don't agree on whether you have to chill the balls at this point -- I found it was necessary.  I actually made up several batches and put them in the freezer until I was ready for the next step.

The first batch I made I tried candy melts as the coating without a good result.  First, I don't really like candy melts.  I don't like how they taste and I don't love the artifical coloring (you will notice that with most of my cupcakes and baked goods I stick with vanilla and chocolate).  Once it was apparent that I was going to have trouble with the melts I quickly switched to melted chocolate chips (mixed with a small amount of vegetable oil) and had good results with that.  For my first batch I dipped the balls in semi-sweet chocolate and sprinkled on some star and tiny ball sprinkles.

These were really fun (and a great size) to send to school for my youngest son's birthday.

The second batch I attempted worked much better.  These were a lot more complicated than the first but not hard, just a little time consuming.  I made the cake balls as before and dipped them in melted white chocolate chips, then set them into mini ice cream cones (you can find these Joy brand cones at Walmart).  It's OK if the coating drips down the cone a little.  While the chocolate is still soft, add some sprinkles. 

For the chocolate sauce I melted semi-sweet chocolate chips and thinned them down with vegetalbe oil.  I poured it into a squeeze bottle and used that to drizzle it over the top of the cookie ball.  The "cherry on top" is a pretzel M&M though you could use plain or peanut M&Ms or even cinnamon candies.

It's a little hard to get a sense for the scale of these from the pictures.  Here's one of me holding one of the finished cones

and another with the mini cones next to a full-sized cone.

These were really delicious and I will make them again.

I also made some really cute hamburger cookies for my kids' birthday parties.  I first heard about these cookied from my sister-in-law Sue who made them with her grandkids this summer.  These are really easy -- they require no baking, just assembly.

This picture shows the steps by row.  First lay down a vanilla wafter with the flat side facing up (not shown).  Top each wafer with a Thin Mint-style cookie (I used Keebler brand Grasshopper cookies).  You can either place them in the oven for a minute to melt the chocolate a bit to adhere to the wafer or use a squirt of icing as "glue" (the latter is a more sure method).  Next, using red and yellow icing add some ketchup and mustard.  Tint some coconut with green food coloring and sprinkle it on the icing.  I added another little dollop of icing in the middle after this step to act as glue and topped the whole thing with another vanilla wafer.  The original recipe called for real sesame seeds on top but I knew my kids would balk at that so I used tiny white sprinkles.  I used my finger to rub a little light corn syrup on the top cookie to help the sprinkles stick.
This is the icing I used -- it worked great as it sets up and glues everything together nicely.  I had to mix my own yellow as I couldn't find the color I wanted in the store.

I also treated myself to a cupcake decorating class at the lovely Occasionally Cake.  In this class we learned to make rolled fondant animals to use as cupcake toppers.  It was fun but I now know why bakeries charge $6-7 for one of these.  I think I'll stick to frosting that tastes yummy and work on perfecting my swirl technique for icing cupcakes.

Now that birthdays are out of the way I have turned my attention to Halloween costumes and three challenges that are coming due very soon.  The first is one sponsored by my sewing guild chapter.  Each participant was given one yard of the same fabric and charged to create something from it.  I can't share my project until after our annual meeting which takes place on October 26th.  My ASG Neighborhood Group is also holding a challenge.  Members exchanged fabric pieces at the beginning of the year with instructions to decorate, embellish or change our given piece anyway we want.  We'll be returning the fabric to its original owner in November.  The third challenge is one that I am very excited about.  It is being sponsored by Sarah Veblen.  Sarah is offering several challenges each year to help sewers approach problem-solving in a creative way.  For this first challenge participants are asked to use one of Sarah's Dressy Dresses as inspiration to create a casual garment.  You can find more information here.  I hope you will consider joining me in this fun challenge.

Monday
Feb112013

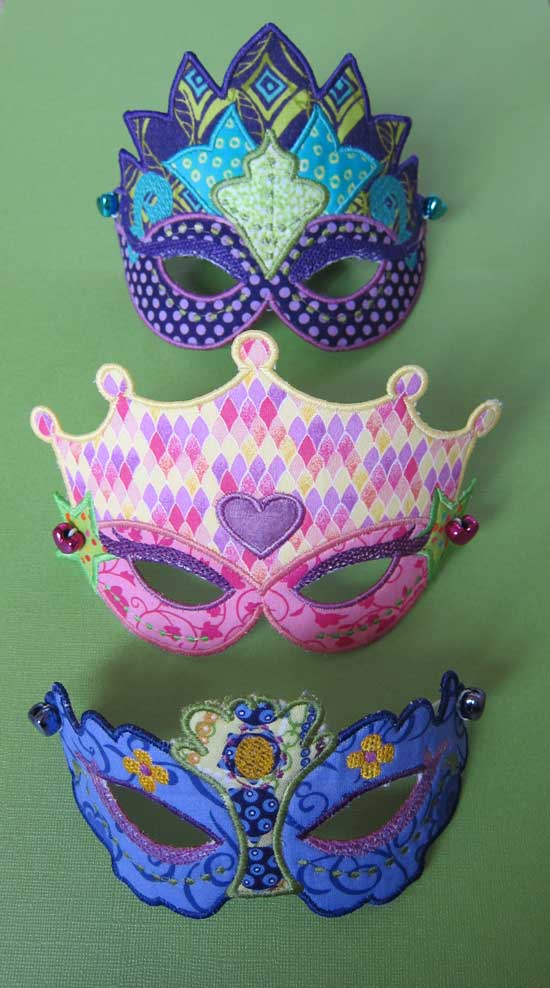
Masks for Mardi Gras

I've been working on these masks for a couple of weeks.  They are for a couple of friends' daughters.  The embroidery designs come from Embroitique and stitch out very nicely.  There are no instructions accompanying the designs, so beginners might have some trouble with this project.  The designer did write a blog post which helped me quite a bit.

My original idea was to make these masks from lamé and other sparkly fabrics but I came to my senses in time and opted for easy-to-work-with quilting cottons.  Even so, I made the blue mask three times.  I would recommend doing a sample to determine how close to trim the fabrics for optimal results.

I hooped two layers of water soluble stabilizer and then used a layer of Floriani's Stitch and Shape which was fantastic for the backing of the mask though fairly difficult to trim away close to the stitching line.  I will experiment with something slightly thinner next time.  After the stitching was complete, I soaked the masks to remove the stabilizer and then shaped them by air drying them wrapped around a cylinder -- I used a rubber band to hold the mask in place on a plastic "jar". 

To attach the elastic band I fed the elastic through one of the stitched (and punched) holes, then through a bead and back through the hole, tying it on the inside.

I am also celebrating Fat Tuesday by baking a King Cake.  You can read my post from last year with all of the details about baking your own.

Laissez les bons temps rouler!