Julie Bowersett

juliebowersett{at}gmail{dot}com
Navigation
Search
Categories

Blog Writing Course Alumni

From Guide to Art Schools

CraftGossip

Entries in machine embroidery (40)

Wednesday
Jun242015

Lace-Edged Baby Blankets

It's been a long time since I've done much heirloom sewing.  But a few weeks ago when I received an email from a church friend I knew it was just what I was intended to do.  I've been participating, sporadically, in the prayer shawl ministry at my church over the last year.  When a request went out for someone to make prayer blankets for twin baby girls with cystic fibrosis (CF) I knew pretty quickly that I was the one who was supposed to take on this project.  For ten years I worked in a hospital lab doing breathing tests on patients, and took a particular interest in the ones with CF.  During that time I met a college student, Chris, who was beating the odds and doing very well managing his disease.  We remained friends over the years and the miles.  I have a friend from my college years who lost his teenage daughter to this disease, and just this spring my family traveled to Richmond to attend a fund raising dinner in Lucy's memory.  CF has touched my life many times over the years.  Those of you who know me well will have also made the connection to twin baby girls.  I lost a set of twin girls at 30 weeks gestation almost 7 years ago.  You can see now why I was sure that I was the one to make these blankets.  At first, I hesitated, thinking about how slowly I knit.  Then I had the flash thought that these blankets did not have to be knit, I could sew them.  And I knew immediately what form they would take.

Years before my kids came onto the scene, I used to travel with my sister to various sewing events.  We attended lots of American Sewing Guild conferences together but our greatest times were spent in Huntsville, Alabama attending Martha Pullen's School of Art Fashion.  There I learned to sew delicate, lacy things in the heirloom tradition.  One of my favorite teachers at these schools was Carol Ahles.  Carol is a wonderful teacher who shares her knowledge and encourages students to do their very best.  One year my sister and I took a class from her on making a lace-edged, hemstitched baby blanket.  She provided luxurious cashmere flannel and Cluny lace for the project. The edges were corded and hemstitched, which gave a lovely and sturdy finish.

Here's the blanket I made in that class

and a close up of the lace edge.

I wrote to Carol and ordered several yards of light pink flannel for my project.  I decided that monograms on the blankets would serve to distinguish them from each other, and I used Hope Yoder's Fancy ABC's for the letters.  The Cluny lace came from my stash. 

The blankets measure 36" x 45" and have rounded corners. 

The edges are hemstitched using the Parisian hemstitch and a 100 wing needle. The cording is size 5 perle cotton.  Here is a close up of the hemstitched edge:

Carol's instructions for these blankets originally appeared in the November/December 2001 issue of Creative Needle magazine.  You can purchase the instructions, along with all of the necessary supplies, from Carol's website.

While I was working on these blankets last week my friend Chris lost his battle with CF at the age of 41.  He lived longer than many with this disease, and the timing of his death in the midst of my project was especially poignant.  I pray that the babies who receive these blankets will grow up in a world where there is a cure for this disease.  If you'd like to help support research into a cure, please consider donating to the CF Foundation.

Monday
Feb112013

Masks for Mardi Gras

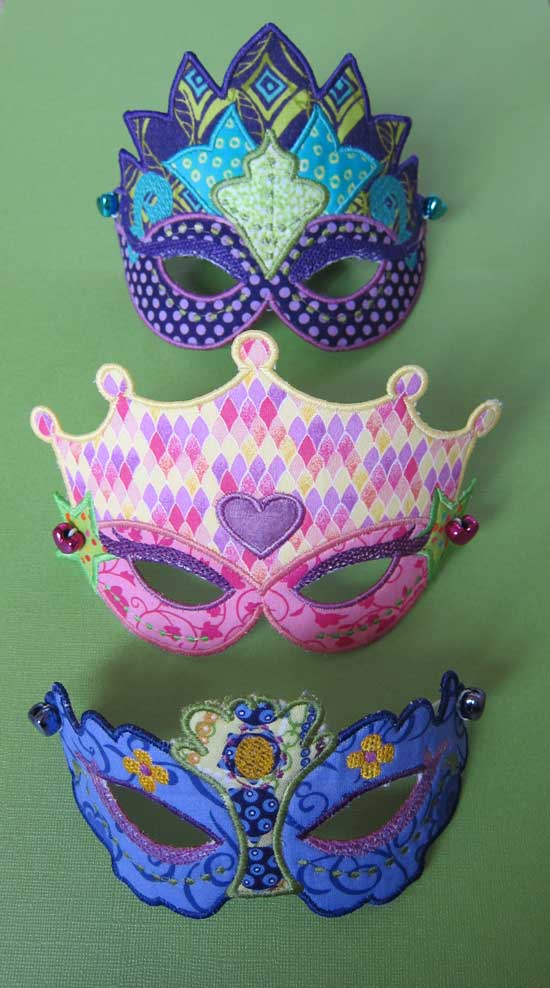
I've been working on these masks for a couple of weeks.  They are for a couple of friends' daughters.  The embroidery designs come from Embroitique and stitch out very nicely.  There are no instructions accompanying the designs, so beginners might have some trouble with this project.  The designer did write a blog post which helped me quite a bit.

My original idea was to make these masks from lamé and other sparkly fabrics but I came to my senses in time and opted for easy-to-work-with quilting cottons.  Even so, I made the blue mask three times.  I would recommend doing a sample to determine how close to trim the fabrics for optimal results.

I hooped two layers of water soluble stabilizer and then used a layer of Floriani's Stitch and Shape which was fantastic for the backing of the mask though fairly difficult to trim away close to the stitching line.  I will experiment with something slightly thinner next time.  After the stitching was complete, I soaked the masks to remove the stabilizer and then shaped them by air drying them wrapped around a cylinder -- I used a rubber band to hold the mask in place on a plastic "jar". 

To attach the elastic band I fed the elastic through one of the stitched (and punched) holes, then through a bead and back through the hole, tying it on the inside.

I am also celebrating Fat Tuesday by baking a King Cake.  You can read my post from last year with all of the details about baking your own.

Laissez les bons temps rouler!

Saturday
Feb182012

Embroidered Labels

Many years ago I asked a friend to digitize a little piece of clip art that I used on my business cards at the time so that I could stitch out labels for my handmade clothing.  My logo was a simple hanger embellished with a flower.  Back when I was doing some dressmaking for hire I used the business name Juliet, Couture and Bridal (JCB being my initials).  The first label I created looked something like this:

This was stitched on ribbon.  I went on to stitch the design out on various fabrics.  This was my favorite,

stitched on a pale grey and white checked linen.  I particularly liked using a patterned background.

Last week I realized I was out of pre-stitched labels and sat down at my machine to make some more.  For some reason, my old design was not speaking to me, and I decided it was time for a makeover of my label.  I still wanted to use a hanger design and found an appropriate one on the internet.  I'm currently loving the floss stitch designs I got from Jolson's Designs so I used one of those.  Once I got the design looking the way I wanted, I started concentrating on color and fabric choices.  I looked at my local fabric store for some light colored checked fabric like the one I used above, but didn't find anything in the color I was looking for.  They did have, however, a subtle paisley print cotton duck which I thought would work well.

I used colors similar to the designs here on my blog.  Here are the labels all stitched out and waiting to be cut.

and here is a completed label.

I particularly like how much depth and interest the print background adds.  I backed the fabric with a fusible tricot interfacing, cut the edges with pinking shears and then applied a thin line of Fray Block around the perimeter. 

While hunting through my closet for examples of my former labels, I was dismayed to discover how few of my garments actually have labels in them.  So, I'm hoping to do better this year and remember to sew labels into my creations.  I am also going to go back and "retro-fit" some of my older clothes with some of my new labels where possible.  After all, what's a designer original without its label?

Friday
Dec232011

Embroidered Poinsettia Pins

Sometimes I get a crazy notion that I have to make a last minute gift for someone.  That happened to me this week.  I decided late in the day that I wanted to take a little something to the Director and Assistant Director of my sons' preschool.  Luckily, I had just received an email from Reen at Embroidery Garden announcing her new Poinsettia Pin which looked like just the ticket.  These stitched up super fast, and in no time I had my gift.  I chose to bead the center of the flowers instead of using a button (these pearls are left over from the beading on my wedding dress).  The printable cards come with the files for the pins.

Tomorrow is Christmas Eve and I'm wishing everyone a joyous Noel.

Tuesday
Dec202011

Christmas at My House

First, I have to confess that I have not felt like fully embracing all of the Christmas hustle and bustle this year.  I’ve been slow to get my decorations up, and I’ve taken a minimalist approach to the ones I have put up.  I haven’t stayed up all night trying to get handmade gifts made.  And I’ve barely done any baking.  But I have enjoyed doing the few things I have done and enjoyed even more the slower approach this year.  Also, while taking pictures in preparation for writing this post I realized that I got more done than I thought.  So, here is my Christmas in review, with commentary.

GIFTS

I stitched up a bunch of Nugget Holders (they each hold a Hershey’s Nugget candy bar) designed by Reen from Embroidery Garden.   I added a hanging loop of monofilament. These stitched up really fast and I used them as little gifts for my boys’ classmates.

I enlisted the help of my five-year-old to address the envelopes.

My son and I also made some cinnamon ornaments to give as gifts.  He attends two different school programs and one of them spent the month of December reading different versions of The Gingerbread Man story.  So we made some gingerbread men for his teachers.  We painted features on them with Puffy Paint. 

I also made Christmas gifts for both boys’ teachers.

BAKING

The only baking I did this year were some sugar cookies.  I found the cookie mix that I LOVE from Trader Joe’s again this year (you can read this post where I wax poetic about this mix from last year).  I used the icing and colored sugar included with the mix to shortcut the entire process.  And these cookies taste GOOD!

DECORATING

Southern Living magazine had an article in November about making Southern-inspired wreaths, and I fell in love with the one made with magnolia leaves, rosemary and dried orange slices.  I had to make my own.  The greenery gets wired to a grapevine wreath, an idea I like because after the holidays I can strip the wreath down to reuse next year.  I already had a wreath in my stash and plenty of rosemary in my garden.  I found some magnolia leaves at a nursery and ordered the orange slices on line.  To attach the oranges I strung gold beads on wire and poked them through the center hole of the orange slice.  I added some cinnamon sticks in lieu of a bow.  This thing smells heavenly.

I used the leftover rosemary and magnolia leaves on my mantle along with some pomegranates and candles.  Simple.

Some of you may remember the elaborate wreath I made last year and wonder why, after all of that work, I wouldn’t use it again.  Never fear.  I have repurposed it for this year, on my dining room table with my mother’s hurricane lamp and candle in the center.

And this year I let my kids decorate the tree.  This translates into three, four, or even five ornaments hanging from the same branch but it does have a certain je ne sais quoi.  Here are my sweet old kitties sleeping in the sun under it.

FAMILY HEIRLOOMS

This category could go on forever, given the number of handmade ornaments on my tree and other precious items passed down to me.  But I particularly want to share two.  This is a crèche made by my dad many years ago from a pattern he found in a magazine.  The pieces fit together in the “stable” and there is even a star that is attached to the roof (which I haven’t managed to unpack yet).  I’ve loved this crèche for years and now my children are enjoying it, too.  My house is filled with things that my dad built for me, and now that he is gone they are even more precious.

Lastly, my mom knit this sweater for me when I was a little girl.  It has been passed down to various children in my extended family throughout the years and now it is my oldest son’s turn to wear it.  He wore this when we visited Santa earlier this week, and had his picture taken in it.  Owls have a special significance in my family, and this is truly a much-loved family heirloom.

I hope each of you is enjoying your own holiday preparations and finding joy in small things this season.